


A practical, jobsite-friendly guide to choosing a location, planning the footprint, and keeping access simple
A safe is one of the few “big, heavy, permanent” items that impacts framing, flooring, electrical planning, and how a homeowner will use the space every day. When builders plan safe placement early—before flooring finishes, trim packages, and final punch—installation is cleaner, bolt-down is easier, and the result looks intentional (not like an afterthought). This guide focuses on the placement fundamentals that help protect valuables and keep access convenient—without overcomplicating the build.
Quick takeaway for builders
Pick a location that supports the safe’s weight, allows a proper door swing, stays out of sightlines, and enables an anchor pattern. Then add one simple upgrade: a nearby outlet (or a plan for safe lighting/humidity control) so the homeowner doesn’t rely on cords and improvised solutions.
1) Start with the “where”: the best rooms for safe placement
The best location is usually the one that balances privacy, structure, and daily convenience. In most new homes, these areas tend to work well:
Common “best-fit” locations
| Location | Why builders like it | What to watch |
| Primary closet (large) | Private, out of guest traffic; easy to plan around cabinetry and closet layouts. | Door swing clearance and shelf/rod conflicts; ventilation and outlet planning. |
| Home office / den | Clean access; can be integrated with millwork or a discreet corner layout. | Visibility from windows; keep it away from primary sightlines. |
| Basement (finished or mechanical area) | Great structure (often slab) and easy anchoring; naturally out of view. | Humidity planning is critical; avoid sump areas and exterior moisture. |
| Interior storage room / pantry-style space | Low visibility; can be framed for an exact footprint. | Don’t block mechanical access; confirm adequate hallway width for delivery. |
A helpful rule of thumb: choose an interior location that’s not visible from a front entry sightline and not against an exterior door path. It’s also wise to avoid rooms where cords, hoses, or frequent moisture are normal.
2) Structure matters: floor loading and “best practice” placement
Safes concentrate weight in a relatively small footprint. That’s why ground-floor slab placements are often easiest from a planning perspective. For framed floors (especially second-story), builders typically think in two directions:
Builder note on floor loads
Many residential design references cite minimum live loads around 40 psf for living areas and 30 psf for sleeping rooms (code minimums vary by jurisdiction and room use). That’s a distributed load—heavy concentrated items should be placed thoughtfully, and when in doubt, confirm with the project’s engineer. Sources summarizing typical code values include UMass Amherst BCT guidance and structural references. (umass.edu)
Practical placement tactics for framed floors:
- Position the safe near a load-bearing wall or over a supporting beam line where possible.
- Avoid “middle of the span” placements in large open rooms when there’s an easy alternative corner location.
- Plan the path: confirm that hallways, turns, and door widths can accommodate delivery equipment.
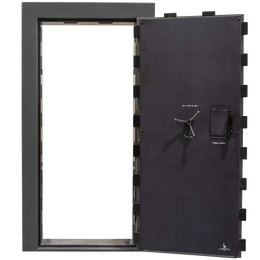
3) Door swing, trim, and “use it every day” clearances
A safe that technically fits can still be frustrating if the door can’t open wide enough for easy access. Before framing is closed up (or before closet systems are installed), confirm:
- Door swing angle: Is there room to fully open the safe door without contacting casing, baseboard, or shelving?
- Handle clearance: Ensure a comfortable “stand zone” in front of the safe door.
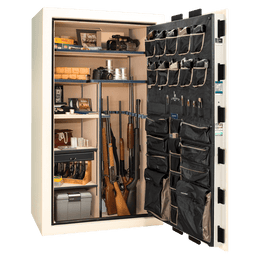
- Lighting: A dark corner becomes a daily annoyance; plan a closet light or safe interior light kit.
Simple upgrade builders can recommend
If the safe is going in a closet or interior room, suggest an interior lighting kit to improve visibility and make organization easier. Liberty Safe offers purpose-built safe lighting options such as the Brightview Safe Light Kit and motion-sensor wand systems like the Clearview Electrical LED Wand Light Kit.
4) Anchoring: plan for it before flooring and baseboards
From a builder perspective, anchoring goes smoother when you reserve the footprint and avoid surprises under the safe. A few planning tips that help installers:
- Keep the safe footprint free of HVAC floor registers, in-floor outlets, or plumbing penetrations.
- If the safe is in a closet, consider leaving clean access for drilling/anchoring (don’t crowd the footprint with fixed cabinetry).
- For finished basements, confirm slab thickness/conditions and avoid post-tension slabs unless plans and procedures are verified by the appropriate pro.
For homeowner-friendly care and placement considerations, Liberty also provides guidance on safe ownership and placement basics on its Gun Safe Use and Care page.
5) Humidity and interior conditions: plan it like any other storage environment
Closets, basements, and garage-adjacent rooms can all swing in humidity seasonally. Many firearm storage references recommend keeping safe humidity roughly in the 40%–50% range to reduce corrosion risk and avoid overly dry conditions for wood components. (gunskeeper.com)
Builder-friendly humidity plan (easy wins)
- Add an outlet: If the safe is planned early, a nearby outlet supports interior lighting and common humidity-control accessories.
- Choose a drier zone: Keep the safe away from known damp corners, exterior foundation seepage areas, or rooms with frequent door-to-outdoor cycling.
- Keep it readable: Encourage a small hygrometer/monitor so the homeowner can confirm conditions quickly.
Did you know? Quick planning facts builders appreciate
Most placement issues aren’t about “space”—they’re about swing
Closets often have the square footage, but shelving and door casing can limit opening angle. A quick mock layout prevents rework.
Residential floor design loads are typically expressed as “psf”
Many references list 40 psf live load for living areas and 30 psf for sleeping areas—distributed across the floor area, not concentrated in one spot. (umass.edu)
Basements can be ideal, but moisture planning is non-negotiable
If the home has seasonal humidity swings, a simple monitoring plan and safe accessories can keep storage conditions stable. (gunskeeper.com)
Step-by-step: a builder checklist for safe placement
Use this quick sequence during design selections, pre-drywall, or final walkthrough planning:
Step 1: Confirm the intended safe type and size
Homeowners often upsell themselves once they understand storage needs. Encourage them to choose the safe footprint early so you can reserve the space cleanly.
Step 2: Choose a discreet interior location
Prioritize interior closets, offices, or basement storage zones—places that aren’t in direct sightlines from entries or common entertaining areas.
Step 3: Plan door swing, approach, and “stand space”
Mark out the safe footprint plus door swing arc. Verify casing, baseboards, closet rods, and shelving won’t interfere.
Step 4: Think structure and anchoring access
Slab is simplest when available. For framed floors, place near supporting elements when feasible, and keep the footprint clear of penetrations to simplify anchoring.
Step 5: Add power and visibility
A single outlet (planned early) helps the homeowner use interior lighting and common humidity-control accessories without extension cords. If the safe interior will be used frequently, consider a dedicated safe LED kit such as Liberty’s Clearview Multicolor Lights for visibility.
Local angle: placement guidance that works across the United States
Because climate and construction styles vary widely across the United States, safe placement is best treated like any other “interior storage environment” decision:
- Humid regions: prioritize interior conditioned spaces and include a simple monitoring plan for humidity. (gunskeeper.com)
- Dry regions: avoid placing the safe where temperature swings are extreme (like unconditioned spaces) to keep storage conditions steady.
- Two-story builds: plan placement early so the safe doesn’t become a last-minute “where can we fit it” decision that creates delivery or structural headaches.
Need help planning safe placement or choosing the right model?
Liberty Safe can help homeowners and builders align safe size, placement, and accessories—so the install goes smoothly and the space works long-term.
FAQ
Where is the best place to put a safe in a new home?
Interior, low-visibility locations tend to work best—like a primary closet, office/den corner, or a basement area with controlled humidity. The “best” spot also allows anchoring access and full door swing.
Can a safe go on a second floor?
It can, but it should be planned early. Safes place a concentrated load, while many residential floor criteria are expressed as distributed live loads (often cited around 40 psf living / 30 psf sleeping depending on use and jurisdiction). When the safe is large or the location is mid-span, it’s smart to confirm with the project’s engineer. (umass.edu)
Do I need power near my safe?
Power isn’t required, but it’s a quality-of-life upgrade. A nearby outlet supports safe lighting and common humidity-control accessories, helping the interior stay usable and organized.
What humidity level should I aim for inside a safe?
Many firearm storage references recommend keeping safe humidity roughly in the 40%–50% range. Using a small humidity monitor makes it easy to confirm conditions. (gunskeeper.com)
How can builders make safe installs smoother for homeowners?
Reserve the footprint early, verify hallway/doorway delivery paths, keep the base area free of penetrations, allow door swing clearance, and add a nearby outlet. Those five steps prevent most “late-stage” placement surprises.
Glossary
PSF (pounds per square foot)
A unit used to describe distributed floor loading. Many residential live load values are expressed in psf. (umass.edu)
Live load
Temporary or variable loads (people, furniture, movable items) a floor is designed to support, often expressed as psf. (umass.edu)
Concentrated load
A heavy load applied over a small area—like a safe footprint—requiring more thoughtful placement than typical distributed loads.
Hygrometer
A small device that measures humidity, useful for monitoring the interior environment near or inside a safe. (gunskeeper.com)