


A practical guide for homeowners who want real protection—without turning a remodel into a redo
If you’re remodeling a home (or planning a move, addition, or basement finish), the best time to think about a safe isn’t after the paint dries—it’s when you can still choose structure, power, and placement. “Remodeler-friendly” safe planning means fewer surprises: no last-minute doorway measurements, no flooring repairs, no awkward cord routing, and no sacrificing daily convenience. Below are proven, trade-friendly ways to pick a safe, prep the space, and keep your home looking finished.
What “remodeler-friendly” really means for a home safe
A remodel-friendly safe setup is one that integrates cleanly with construction realities: framing, slab thickness, finished flooring, door swings, stair geometry, and future service access. Instead of forcing a heavy, high-security product into a tight finished space, you plan the “path” and the “parking spot” first—then choose the safe size and features that match.
Step 1: Choose the “safe zone” before you choose the safe
Homeowners often pick a model first, then discover it won’t clear a turn on the stairs or it lands on a heated floor zone. A remodel-friendly workflow flips that: pick the installation zone and the delivery path first, then pick the safe that fits.
Quick placement checklist (builder-grade practical)
If you’re comparing security categories, it helps to understand the common “RSC” term (Residential Security Container). UL explains that UL 1037 covers RSCs—often what people call “gun safes”—and describes the standardized attack testing that differentiates security levels. (ul.com)
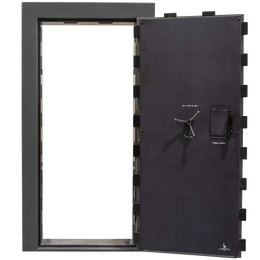
Step 2: Plan anchoring during framing and flooring—not after
Anchoring is one of the most remodel-sensitive parts of safe ownership. The best install is typically the one that avoids cutting finished flooring later, avoids hitting radiant heat tubing, and gives the installer a clear shot at solid structure.
Remodel-friendly anchoring tips
A detail many people miss: UL notes that certain security-container testing may be affected by whether the product can be reliably mounted and whether installation provisions/instructions exist. That’s another reason to treat mounting as a first-class part of the plan, not an afterthought. (ul.com)
Step 3: Build in power, lighting, and humidity control the clean way
Remodel-friendly doesn’t mean “more gadgets.” It means doing the basics elegantly: a clean outlet, tidy interior lighting, and a humidity plan that fits your climate and where the safe will live (garage, basement, interior closet, etc.).
Humidity control basics (what actually works)
In many homes, a small dehumidifier rod is a simple, remodel-friendly option because it uses standard 110–120V power and is designed to gently warm the safe interior to reduce humidity-related issues. (lockdown.com)
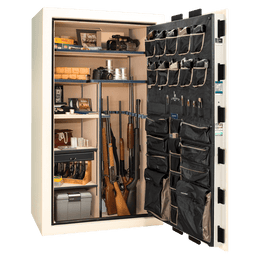
Interior visibility: small upgrade, big daily payoff
Remodelers love upgrades that don’t change structure. Interior lighting is one of those: it improves day-to-day usability (especially in closets and basements), reduces fumbling, and makes organization systems easier to maintain.
Did you know? Quick facts that help you buy smarter
Step 4: Match safe type to what you store (and how your remodel changes that)
A remodel often changes what you own and where you keep it—new jewelry storage, upgraded documents, tools, collectibles, or sporting equipment. It’s smart to treat safe sizing like closet design: build in margin so you don’t outgrow it right after the project.
| Remodel scenario | What to prioritize | “Remodel-friendly” note |
|---|---|---|
| Finishing a basement | Humidity plan, discreet placement, lighting | Add an outlet behind/near the safe before drywall for a clean install. |
| Master closet build-out | Door swing clearance, accessibility, interior organization | Plan shelving and hanging rods so they don’t block the safe door’s full opening. |
| Garage organization overhaul | Moisture control and stable temperature | Garages swing hot/cold—plan for humidity monitoring and consistent air control. |
| New flooring (tile/LVP/hardwood) | Anchoring plan, protective pads/spacing (as appropriate) | Install/anchor at the right stage to avoid cracking tile or marring finished surfaces. |
If document protection is a major goal (birth certificates, passports, titles), pay attention to recognized fire-test classes. UL 72 specifically ties Class 350 devices to protecting paper records and sets internal temperature/relative-humidity limitations by class. (ulnormdoc.com)
Step-by-step: A remodel-ready safe plan (7 steps)
For ongoing ownership support and safe care guidance, Liberty Safe also provides resources on use, care, and placement considerations. See Gun Safe Use and Care
Local angle (United States): climate swings and home types change the “best” plan
Across the United States, homes vary widely—slab-on-grade in many regions, basements in others, and garages that can see dramatic temperature swings. That means “one perfect setup” doesn’t exist. A remodel-friendly approach adapts to your home:
Ready to plan a remodel-friendly safe setup?
If you want help choosing a placement plan, sizing for future needs, or selecting accessories that keep the install clean, Liberty Safe can help you map the right solution for your home.
Contact Liberty SafeFAQ
What makes a safe “remodeler-friendly”?
It’s less about a single model and more about the plan: a measured delivery path, a structurally sound location, a clean anchoring approach, and power/lighting that’s integrated before walls and floors are finished.
Should I install the safe before or after new flooring?
Many homeowners prefer installing (and anchoring) at a stage that avoids damaging finished flooring—especially tile. Your best timing depends on whether you’re anchoring to slab or framing, and whether baseboards/trim will need to be fit around the safe footprint.
Do I need power inside the safe?
Not always, but it helps. Power enables simple humidity control and interior lighting, both of which improve long-term usability. Many dehumidifier rods are designed for standard 110–120V power and work by gently warming and circulating air inside the safe. (lockdown.com)
What does “RSC” mean when shopping for a gun safe?
“RSC” stands for Residential Security Container. UL describes RSCs under UL 1037 and explains attack testing and multiple performance tiers that help distinguish security levels. (ul.com)
How should I think about fire protection for important paper documents?
Look for recognized fire-test classifications designed for record protection. UL 72 describes Class 350 devices as intended to protect paper records, with specific interior temperature and humidity limits by class. (ulnormdoc.com)