


Daily habits that protect what you store—without overthinking it
A quality safe is only as effective as the way it’s installed, operated, and maintained. Whether you’re storing firearms, documents, jewelry, or heirlooms, “safe operation basics” comes down to a few repeatable routines: smart placement, clean lock habits, moisture awareness, and simple interior organization. This guide is built for real households in the United States—clear steps, practical do’s and don’ts, and a checklist you can actually follow.
1) Start With the “3 Fundamentals”: Location, Anchoring, Lock Routine
Most safe problems people experience aren’t “safe problems”—they’re placement and routine problems. Before you focus on accessories or interior layouts, get these three fundamentals right:
Fundamental #1: Choose a smart location
Prioritize a spot that’s out of casual view (not visible from windows or typical traffic paths). From a fire-protection standpoint, many homeowners place safes on the lowest level available. Liberty Safe also recommends a climate-controlled environment and suggests using a moisture barrier under the safe to help protect the bottom surface. (libertysafe.com)
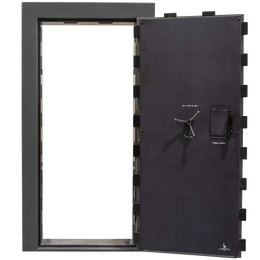
Fundamental #2: Anchor the safe (when appropriate)
Anchoring is a major security upgrade because it helps prevent tipping, shifting, or removal attempts. Liberty Safe notes that safes typically include pre-drilled holes (often used for shipping) that can be used for anchoring once the safe is positioned and leveled. (libertysafe.com)
Fundamental #3: Build a lock routine (so you don’t get locked out)
Electronic locks are fast and convenient—but they require consistent habits. Use the same hand position, don’t rush, and avoid repeated “guess attempts.” Some electronic safe locks use a penalty/lockout period after multiple incorrect entries (a normal security feature). (manuals.plus)
2) Know What Your Safe Rating Means (Without Getting Lost in Jargon)
Many home and gun safes fall into a category commonly called a Residential Security Container (RSC). UL describes RSCs as products intended to resist a brief hand-tool attack test, and UL’s standard updates introduced multiple performance levels (with the long-standing baseline including a five-minute net working-time test using common hand tools). (ul.com)
What this means for everyday operation
Ratings help you compare safes, but your day-to-day results still depend heavily on installation (anchoring, concealment, and environment) and consistent operation. In other words: a good safe plus good habits beats a good safe with sloppy routines.
3) Step-by-Step: Everyday Safe Operation (Fast, Consistent, Low-Stress)
Step 1: Open with intention (avoid keypad “panic tapping”)
Enter your code at a steady pace. If you make a mistake, many keypads allow you to clear and restart rather than continuing with incorrect entries. Some lock instructions specify pressing the * key twice to clear and try again, or waiting briefly for the lock to reset input. (manuals.plus)
Step 2: Open the door fully before loading/unloading
Fully open the door so shelves and door panels aren’t working against you. This reduces bumps, dings, and rushed movements—especially helpful when you’re placing valuables back in a consistent spot.
Step 3: Close, then lock (and confirm)
Close the door gently, engage the handle/bolts as intended, then lock. Give the handle a brief check to confirm it’s secured—make this your automatic “final step.”
Step 4: Keep batteries fresh (for electronic locks)
Many lock issues start with weak batteries, not “bad locks.” Replace on a schedule you can remember (some people tie it to a holiday or season change). If the keypad behavior changes—extra beeps, delays, inconsistent response—address power first.
4) Moisture & Interior Conditions: The Quiet Threat to Stored Valuables
A safe isn’t always airtight, and the environment around it matters. If your safe sits on concrete or in a basement/garage-adjacent space, moisture management becomes a normal part of ownership. Liberty Safe specifically recommends placing a moisture barrier (like a carpet remnant) between the safe and the floor to help reduce rust risk on the bottom surface. (libertysafe.com)
Practical moisture-control basics
• Measure it: Add a simple hygrometer so you’re not guessing.
• Stabilize the room when possible: If the room stays humid, consider improving ventilation or using a room dehumidifier.
• Use a safe-specific solution: Many owners choose a gentle warming rod or desiccant system to reduce condensation risk inside the safe (especially where temperatures swing). (These are general best practices; follow the instructions for your chosen accessory.)
• Don’t ignore the floor: Concrete can contribute to temperature/humidity swings; a barrier under the safe is a simple upgrade.
5) “Did You Know?” Quick Facts That Make Ownership Easier
A safe can be level-tested by its door behavior
Liberty Safe notes you can check level by opening the door and seeing whether it stays in position; if it swings open/closed, shimming may be needed. (libertysafe.com)
Some electronic locks intentionally “lock you out” after repeated wrong codes
Certain electronic lock guides describe a penalty time (e.g., 10 minutes after multiple incorrect attempts) to reduce unauthorized entry attempts. If this happens, waiting out the penalty time is often the correct move. (manuals.plus)
A moisture barrier under the safe is a simple “set it and forget it” upgrade
Liberty Safe recommends a barrier (like a scrap piece of carpeting) between the safe and floor to help protect the bottom surface. (libertysafe.com)
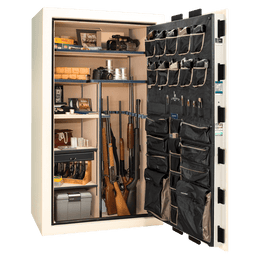
6) Make Your Safe Easier to Use (So You Actually Use It)
The best safe setup is the one that’s effortless at night, during a busy morning, or when you’re heading out the door. A few practical upgrades can reduce friction:
Interior lighting for quick visibility
If you ever find yourself using a phone flashlight to see inside your safe, dedicated interior lighting can make access faster and reduce fumbling.
Organize “frequent access” items up front
Store daily-access items in the easiest-to-reach area. Deeper shelves can hold items you rarely need, so you’re not moving things around every time you open the door.
Keep ownership and support resources handy
Save your safe’s model info, serial number, and key documents in a secure place. If you ever need operating guidance, Liberty Safe provides owner resources and “use and care” instructions.
7) Local Angle: Safe Ownership Across the United States
The U.S. has huge swings in climate—from humid coastal regions to dry high-desert air—so “safe operation basics” should always include a quick check of your local conditions. If you live where seasons bring large temperature changes, you’ll benefit from:
• Stable placement: away from exterior doors/windows and rapid temperature swings
• A moisture plan: hygrometer + appropriate interior control
• A floor barrier: especially on concrete slabs or basement floors (libertysafe.com)
If you’re unsure whether your location is “high risk” for moisture, that’s a good sign you should measure it. Once you have real numbers, it’s much easier to decide what accessories (if any) are worth it.
Want help with your safe setup or support?
If you need assistance with safe use, placement guidance, or general questions, Liberty Safe’s team can help point you in the right direction.
FAQ: Safe Operation Basics
Why does my keypad beep and then stop responding?
Many electronic locks have a penalty time after multiple incorrect code entries. During penalty time, the lock may ignore input for several minutes. Some manufacturer guidance recommends leaving the battery installed and not touching the keypad until the penalty period ends, then retrying a valid code. (sargentandgreenleaf.com)
What’s the easiest way to reduce moisture risk?
Start with fundamentals: keep the safe in a climate-controlled area when possible, add a moisture barrier under the safe, and use a hygrometer so you can act on real humidity readings. Liberty Safe specifically recommends using a barrier (like carpet) between the safe and the floor. (libertysafe.com)
How do I know if my safe is level?
One simple check is whether the door stays put when open. Liberty Safe notes that if the door swings open or closed on its own, you may need to shim the safe to level it. (libertysafe.com)
Should I anchor my safe?
Anchoring is widely considered a strong security improvement. Liberty Safe describes anchoring through pre-drilled holes in the safe floor (commonly the same holes used for shipping) once the safe is placed and leveled. (libertysafe.com)
What does “RSC” mean on a safe listing?
RSC stands for Residential Security Container. UL explains that RSCs are tested against a brief hand-tool attack, and UL’s RSC standard has been updated to include multiple performance tiers to help differentiate security levels. (ul.com)
Glossary (Simple Definitions)
RSC (Residential Security Container)
A UL-described category often associated with “gun safes,” designed to resist a brief hand-tool attack test; UL has updated the standard to include multiple performance levels. (ul.com)
Penalty Time
A lock security feature where the keypad won’t accept opening attempts for a set period after multiple incorrect entries. Some lock guides describe penalty time durations such as 10 minutes after repeated wrong codes. (manuals.plus)
Moisture Barrier
A protective layer (often carpet or similar material) placed between the safe and the floor to help reduce moisture contact and rust risk on the safe’s bottom surface. (libertysafe.com)