


A practical, home-friendly guide for placing and anchoring a safe with confidence
Installing a safe in a closet or bedroom is one of the most common (and smartest) choices for homeowners who want security without giving up living space. The key is doing it thoughtfully: pick a location that makes sense for your routine, respects the realities of flooring and moisture, and supports proper anchoring so the safe stays put. This guide walks through the decisions that matter most—without overcomplicating it.
Quick takeaway
The “best” closet or bedroom location is the one that balances: (1) structural support, (2) discreet visibility, (3) easy daily access, (4) humidity control, and (5) a clean anchoring plan.
1) Closet vs. Bedroom: What Changes?
Both locations can work extremely well. What changes is how you manage space, sightlines, and the structure you’ll anchor into.
One practical builder-style rule: before you commit, confirm that casing/baseboards, closet rods, shelving, and door trim won’t block the safe door or keypad/handle area. Liberty Safe also emphasizes these “real world” clearance checks in placement guidance. (libertysafe.com)
2) The 5 “Non-Negotiables” for Closet & Bedroom Placement
Non-negotiable #1: Pick a low-visibility spot
Avoid placing a safe where it’s visible from windows, open hallways, or typical foot traffic. Closets naturally help, but a bedroom can work too with thoughtful layout (corner placement, behind a door swing, or integrated into cabinetry).
Non-negotiable #2: Confirm the floor can support the weight
A safe concentrates a lot of weight into a small footprint—especially once it’s loaded. If you’re installing on an upper level, aim to place it where support is strongest (commonly along a load-bearing wall or where floor joists can better carry the load). When in doubt, consult a qualified contractor for your specific home.
Non-negotiable #3: Have a humidity plan
Closet installs can trap stale air. Use a simple approach: keep the interior clean, avoid storing damp items, and consider a safe dehumidifier or desiccant system. Some guidance recommends targeting moderate humidity (often cited around the 40%–50% range) to help reduce corrosion risk and protect stored items. (libertysafe.com)
Non-negotiable #4: Plan your door swing and daily access
Can the safe door open fully without hitting walls, shelves, or bed frames? Can you comfortably reach the handle and lock? A “good” install is one you can operate smoothly without rearranging your room every time you need access.
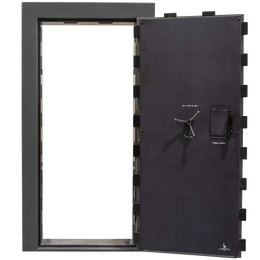
Non-negotiable #5: Anchor it (correctly) whenever possible
Anchoring helps prevent shifting and makes removal far more difficult. The best anchor method depends on whether you’re on concrete, a wood subfloor, or another surface—so the planning matters as much as the hardware.
Did You Know? (Quick Facts That Help You Shop Smarter)
A “fire rating” is a time-and-temperature performance claim
For many safes, a rating like “60 minutes” is tied to keeping the inside below a key temperature threshold (commonly referenced around 350°F for paper) for that duration under a specified test exposure. (thesafemarket.com)
RSC is a common baseline burglary-resistance category
You’ll often see references to UL “Residential Security Container (RSC)” when people discuss entry-level burglary ratings. Some state standards also reference safes meeting UL RSC requirements when defining a “gun safe.” (oag.ca.gov)
Moisture management matters more in basements—but closets can trap humidity too
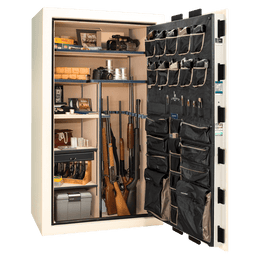
A closet safe can sit in a low-airflow pocket of the home. A simple light kit can also make it easier to see what you’re doing (and reduce “bumped edges” on stored items).
Step-by-Step: Closet & Bedroom Safe Installation (Practical Checklist)
Step 1: Measure the path, not just the final spot
Measure door widths, hallway turns, stairs, and closet openings. Also check for fragile flooring transitions (tile edges, hardwood thresholds) that may need protection during delivery.
Step 2: Choose a “stud-friendly” wall when possible
Even if you’re primarily anchoring to the floor, placing the safe against a wall with accessible studs can expand your anchoring options (especially on upper floors). It can also help keep the safe aligned and stable.
Step 3: Protect the floor and manage moisture at the base
On certain floors, a stable spacer (like appropriately sized plywood) can help distribute weight and simplify leveling—especially in carpeted closets. If your safe is on concrete, many general safe manuals recommend avoiding direct contact to help reduce moisture transfer and encourage using internal dehumidification. (manuals.plus)
Step 4: Anchor with the right hardware for your surface
Concrete slab: Many installers use concrete anchors matched to the safe’s bolt pattern and slab condition; sealing around anchor points can help reduce moisture intrusion around holes. (maden.co)
Wood subfloor (typical bedroom/closet): Use hardware intended for wood framing and aim to align with solid structure (joists/studs) per manufacturer guidance. If you’re unsure, a professional installer can confirm the safest anchor plan for your specific home build.
Tip: Don’t guess on bolt length or location. Locate joists/studs, mark precisely, and keep fasteners clear of plumbing/electrical runs.
Step 5: Add visibility and organization upgrades
A closet-safe setup often benefits from better interior lighting (helps you quickly confirm what’s inside and avoid bumping stored items). If you want a clean, purpose-built option, Liberty Safe offers interior lighting kits designed for safe interiors:
Step 6: Keep key support resources easy to find
Save your safe’s model info and support links where you can find them quickly. If you ever need help with service, operation, or support, Liberty Safe maintains a dedicated help/contact page:
Local Angle: What “United States” Homeowners Commonly Overlook
Across the U.S., home construction varies widely—slabs in some regions, crawlspaces in others, and plenty of second-floor bedrooms with engineered joists. That’s why “closet & bedroom safe installation ideas” should always include a quick structure check and a humidity check.
Also, some U.S. buyers like to understand common baseline standards referenced in the market. For example, California’s published gun safe safety standards reference UL RSC listing by an NRTL as one way a safe can qualify under their definition of a “gun safe.” Even if you don’t live in California, knowing what standards are commonly referenced can make comparison-shopping clearer. (oag.ca.gov)
A helpful mindset for placement
Treat your safe like a built-in: plan clearance, lighting, airflow, and maintenance access now, so you don’t have to relocate it later (which is usually the most expensive “mistake”).
Want help choosing the right setup for your home?
If you’re deciding between a closet install and a bedroom install, or you want guidance on sizing, placement, and accessories, Liberty Safe’s team can point you in the right direction.
FAQ: Closet & Bedroom Safe Installation
Should a safe go on the first floor or second floor?
If both are options, many homeowners prefer a first-floor placement because it can simplify delivery and anchoring (often onto a slab). A second-floor closet or bedroom can still work well—just pay closer attention to structure and anchoring into framing.
Do I really need a dehumidifier inside my safe?
If your home has seasonal humidity swings or the safe is in a low-airflow closet, a dehumidifier rod or desiccant can be a worthwhile, low-effort upgrade. Aim for stable, moderate humidity rather than “as dry as possible.” (libertysafe.com)
What does a “60-minute fire rating” actually mean?
Fire ratings vary by test method, but commonly a time-based rating indicates the safe was tested to maintain internal temperatures below a specified threshold for that duration under a defined heat exposure. Some explanations cite keeping the interior under about 350°F for paper protection during the rated period. (thesafemarket.com)
Can I install a safe in a closet with carpet?
Yes, but plan for leveling and stability. Many owners use a stable base strategy (often involving a solid spacer board) to reduce rocking and help distribute weight more evenly.
Where can I find Liberty Safe support for manuals, use, and care?
Liberty Safe provides owner resources and use-and-care guidance online. Start here:
Glossary (Helpful Terms)
RSC (Residential Security Container)
A commonly referenced burglary-resistance category often associated with UL testing; some state guidance references UL RSC listing when defining certain “gun safe” standards. (oag.ca.gov)
Dehumidifier rod / desiccant
Tools used to reduce or stabilize humidity inside a safe. Rods often gently warm air to discourage condensation; desiccants absorb moisture.
Fire rating (time-based)
A performance claim indicating how long a safe was tested to keep interior conditions under a specified threshold at a stated exposure—commonly discussed in 30/60/90/120-minute categories. (thesafemarket.com)